Installing Magento 2.3.0 on a Local Windows Host

Magento is a powerful eCommerce solution that runs on a Linux environment. If you are a small business owner or a technical person that wants to try out Magento locally without investing in a whole new operating system, there is a way you can install it on your local machine.
In order to install it on a local Windows system, you will need to first download XAMPP. From here you will be able to manage the services for the Apache application server as well as the MySQL database. For Magento 2.3.0, it is very important that you download the specific versions mentioned here as you will run into a lot of trouble when it comes to version mismatches.
Step 1: Install XAMPP
Download XAMPP for Windows version 7.2.14
 |
| Just click OK to continue. |
This installation wizard will open. I recommend doing a straight install that includes all of the selected components.
 |
| Click Next > |
You will see the XAMPP Control Panel v3.2.2.
The modules that we are interested in here will be Apache and MySQL. If you select Start under Actions for the Apache module, you may receive an error message in the window below.

This is because it is automatically set to use port 80. Port 80 is used by other Microsoft applications such as Skype. We will need to change this port to another port. I chose to use port 7777.
To make this change, click on the Config button on the Apache line. A dropdown will open with several options. Select the first one that says Apache (httpd.conf).
Within this config file, you want to basically find and replace 80 with 7777. It will be in three places:
- #Listen xx.xx.xx.xx:80
- Listen 80
- ServerName localhost:80 (a bit further down)
Once you have replaced 80 with 7777, save the document and close. Next, we will go back to XAMPP Control Panel and on the right-hand side, you will see another Config button at the top.
Click on that Config button and under Autostart of modules, check the box for Apache.
Then click the button for Service and Port Settings. Change the Main Port from 80 to 7777.
 |
| Click Save and Save. |
Now, restart the services for Apache and MySQL.
Voila! You now have a Linux server running on your Windows system. Next, we will install Magento.
A few things to note here:
- Apache will be your Application Server
- The root is going to be C:\xampp\htdocs
- PHPMyAdmin will be your database tools
Step 2: Install Magento
Now we need to extract this file to our new root folder but first, we need to create a folder called Magento in C:\xampp\htdocs. You can create the Magento folder inside the htdocs folder from File Explorer first and then select it during extraction, or create the folder directly from the extraction by clicking on htdocs and selecting New Folder.
Next, we need to make some modifications to the php.ini file. We are going to enable a few extensions:
Go back to the XAMPP Control Panel and click the Config button on the Apache line. This time we are going to select PHP (php.ini) from the dropdown list.
To enable an extension, we will remove the semicolon in front of the extension we want to enable:

Do a find for the following 3 extensions and remove the semicolon (;) in front of each:
- xsl
- intl
- soap
Step 3: Create a Database
Now we are ready to create our database. Go to a browser and enter the following url:
Click the tab at the top for Database.
 |
| Name the database Magento and select Collation from the dropdown menu. Click Create. |

Now in the left pane, you will see your new database listed.
Step 4: Finally, time to Setup Magento
If you followed the above instructions exactly, you should have gotten to this point without any problems. Now, its the moment of truth. You may experience several issues from this point on, so be sure to pay close attention.
Go back to your web browser and enter the following url:
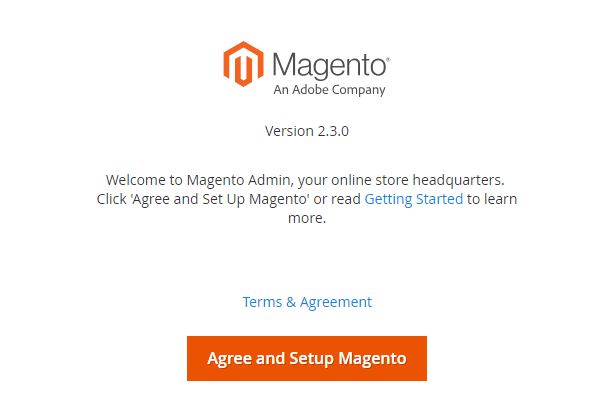 |
| If you get this screen, you are doing great! Click Agree and Setup Magento to continue. |
- Step 1 of the Magento Setup is a readiness test. You may receive an error such as:


This means you either skipped enabling the extensions in Step 2, didn't save your file, or more extensions need to be enabled. Note the extensions marked with a red X and perform the actions in Step 2 to enable these extensions. Don't forget to save the document and then restart the services. Then come back and click Try Again at the top of the page.
 |
| Once you see this screen, click the Next button at the top of the page to continue. |
- Step 2 of the Magento setup is to add the database to Magneto.
 |
| We did not set up a password for the database so you can leave it blank. Database name will be whatever you named it in Step 3. Leave the first two as is. |
- Step 3 of the Magento setup is the Web Configuration.
 |
| "Magento" in the store address is the folder that we created in step 2; where we extracted the Magento file that we downloaded. Remember that C:\xampp\htdocs is our root for all intents and purposes. If you named this folder something else, be sure to use the same name here. "Admin" will actually have several characters after it by default. I have removed them for ease of use, but you are welcome to keep it or name it something completely something else. |
- Step 4 of the Magento setup is the Customize Your Store.
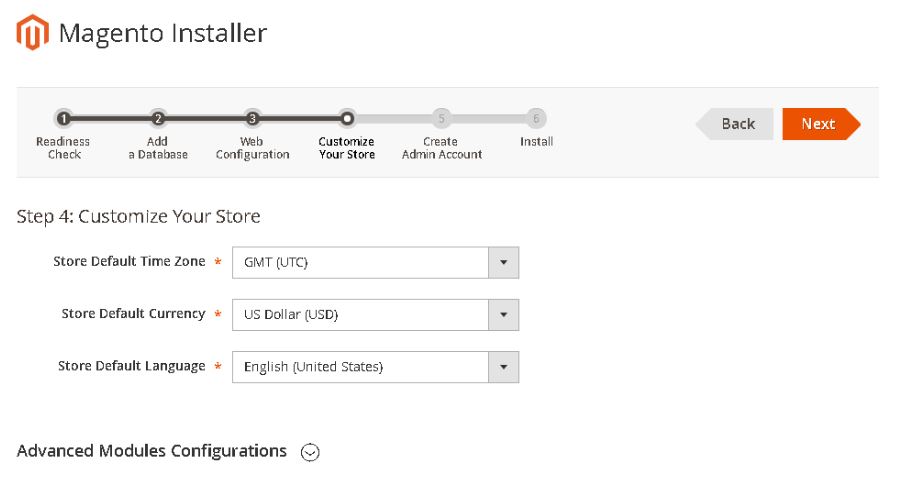 |
| Setup your store defaults. Click Next. |
- Step 5 of the Magento Setup is to Create an Admin account for Magento.
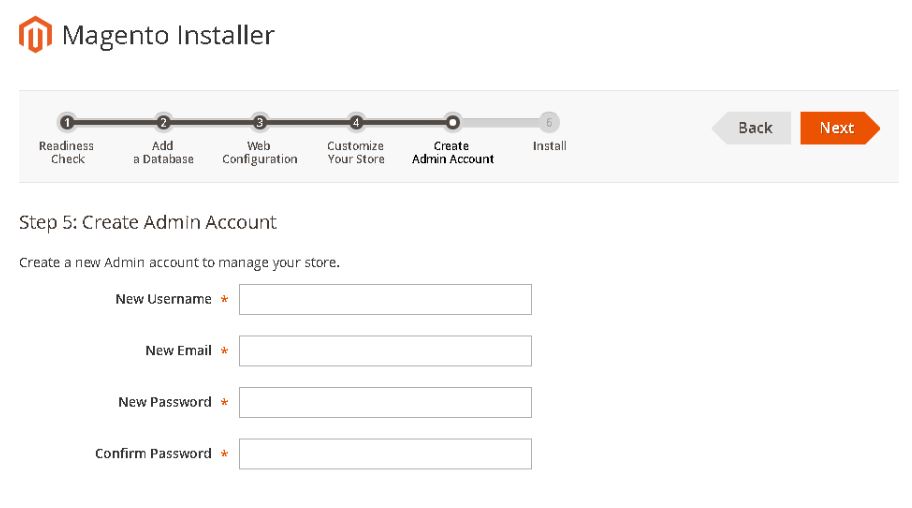 |
| Fill in the information for the Admin account. Click Next. |
- Step 6 of the Magento Setup is to Install Magento.
 Click Install Now and have a lot of patience. There will be times when it seems like it isn't doing anything at all. If you are not sure, you can open the console log below the progress bar and see if it is actually performing any actions. Just be patient.
Uninstalled XAMPP, opted for it to delete the folder once it was installed. Of course, it didn't so I went to the folder in File Explorer and deleted it. Then, I started the whole thing over again making sure to use a fresh download of the Magento file.
- Magento is successfully installed!
You will receive a success message that says to "Please keep this information for your records". Be sure to screenshot that information and save it somewhere for future use.

Step 5: The Moment of Truth
Now we go back to our browser and go to the following url:
You should be seeing a page that says LUMA at the top (Magento default theme). If you get a black screen, keep going with these instructions.

Also, go to the following url:
You should see a login screen for the Admin panel.
 |
| Login with the credentials created in Step 5 of the Magento Setup. |
If you see a broken image instead of the Magento logo, you will need to continue with the instructions. When you log in, you will notice that the logo is also missing at the top left-hand corner of the screen, and the "processing wheel of death" may just spin and spin. You aren't done yet.
If you were able to access these without issue, Congratulations, you are done! You may explore all the greatness Magento has to offer to meet all of your eCommerce needs.
In step 6, we will discuss how to fix the above-mentioned problems.
Step 6: Tying up loose ends.
First, we are going to start off modifying the Validator.php file, and then we are going to re-index our Magento modules.
Modifying the Validator.php File
Go to file explorer and go to:
C:\xampp\htdocs\Magento\vendor\magento\framework\View\Element\Template\File
Open Validator.php in a code editor like Notepad++. I do not recommend opening in regular notepad, although it should work just the same.
Search for:
Comment it out with // in front of it like this:
// $realPath = $this->fileDriver->getRealPath($path);
Below this line, add the following:
$realPath = str_replace('\\', '/', $this->fileDriver->getRealPath($path)); //EH0219
Best Practice: I have placed //EH0219 to document that Elizabeth Huber added this line in Feb. 2019.
We are telling the system to use a single forward slash instead of a double backslash. This is because Windows does not use double backslashes.
Once that is done, save and close the document. You are welcome to restart your services and try again but you may receive an error message. This is because we need to reindex our Magento modules.
Reindexing Magento Modules
Go back to your XAMPP Control Panel. On the right-hand side, there's a button with a cmd prompt icon that says Shell.You will notice that it opens a cmd environment in folder C:\xampp. We need to be in C:\xampp\htdocs\magento. To do this, we will enter the following:
# cd C:\xampp\htdocs\Magento <press enter>
Now that we are in the correct folder, we will type in the following:
# php bin/magento indexer:reindex <press enter>

You may need to make one more modification.
Go to File Explorer and navigate to:C:\xampp\htdocs\Magento\app\etc
Open di.xml with a code editor and search for:
Magento\Framework\App\View\Asset\MaterializationStrategy\Symlink
Comment this line out (by placing // in front of the line), copy the full string:
<item name="view_preprocessed" xsi:type="object">Magento\Framework\App\View\Asset\MaterializationStrategy\Symlink</item>
Paste this just below this line and change Symlink to Copy:
<item name="view_preprocessed" xsi:type="object">Magento\Framework\App\View\Asset\MaterializationStrategy\Copy</item>
| Will look like this. |
If you know a way to streamline these steps, please let us know in the comment section. This is just how I was able to get it up and running for myself. I hope that it works for you too.
I honestly don't know very much about Linux or PHP. I have usually only worked with Microsoft proprietary applications. My specialty with Magento up until this point has been supporting the integration of Magento to Microsoft Dynamics NAV. In a later post, we will discuss the integration with Microsoft Dynamics NAV and Business Central using the TINX-IT connector.

This is very useful. I had both of these errors when installing 2.3. This is the first post I've seen where both issues are resolved in one place.
ReplyDeleteIt is true that Magento is nothing without extensions but since it now offers PWA, the only extension one would need is the Magento SEO extension
ReplyDeleteI'd like to express my gratitude for writing such a helpful article about Magento Certified Developers Team. This article provided me with some useful knowledge. Thank you for sharing that. Keep up the good work.
ReplyDeleteGreat job for publishing such a nice article. Your article isn’t only useful but it is additionally really informative. Thank you because you have been willing to share information with us. Read more info about Indonesia import data
ReplyDeleteYou've created an excellent blog about IT Consulting Firm in NYC. Your blog gave me some unique and useful information. Thank you for bringing this article to our attention.
ReplyDelete